So now you’re a proud owner of a Proxmark3 device and you want to know where to start, right? As we mentioned in the previous post, the best way to start is to dig up the Proxmark3 forum posts, be ready to register and start searching.
In this blog post, I’m going to guide you through the process from connecting the Proxmark3 to run your first command with an up-to-date firmware. The first thing you need to know is that the environment consists of two main artifacts: client software (the thing you’ll run using your OS) and firmware/device software (bootloader, FPGA image and OS image).
In order to download the full environment, browse and clone: https://github.com/Proxmark/proxmark3. Then, it’ll all depend on your OS and the version of the firmware already installed in your Proxmark3. Open your eyes widely here! Yes, after version around 654, the method (software point of view, the USB cable is still there, haha!) of connecting your Proxmark3 to the computer was changed to a better one (trust me, it’s MORE than better) from HID to CDC. Read here if you want to know about this history: http://www.proxmark.org/forum/viewtopic.php?id=1467
So, if you’re using Microsoft Windows (ooook, well, I forgive you :P) follow all the steps here: https://github.com/Proxmark/proxmark3/wiki/Windows. Don’t worry, I know there are a lot of steps, but follow them carefully only once, and then, you’ll see it’s really easy to update the environment every time you need to do it.
If you are using GNU/Linux, any flavor, you are kind of a geek then, you’re on your own. Hehehe, I’m kidding, even tough you’re a geek / nerd, you’ll need some help, so follow the steps here: https://github.com/Proxmark/proxmark3/wiki/Gentoo%20Linux. Yes, I know it’s not written for every different distro, but I’m pretty sure that with these guidelines you’ll make it. For example, if you’re using some Debian based distro, don’t use “emerge”, just use apt-get. You’ll see that everything compiles, right out of box.
And finally, OSX also supports Proxmark3 environment. The steps are quite similar to GNU/Linux, open a console, and go ahead. You might need “Macports” and a full installation of “XCode” running. I can say that it’s working fine on OSX because I’m using this OS as my main OS.
Ok, assuming you’re done compiling and you followed the Flashing procedure here: https://github.com/Proxmark/proxmark3/wiki/compiling you should be in a very good position now.
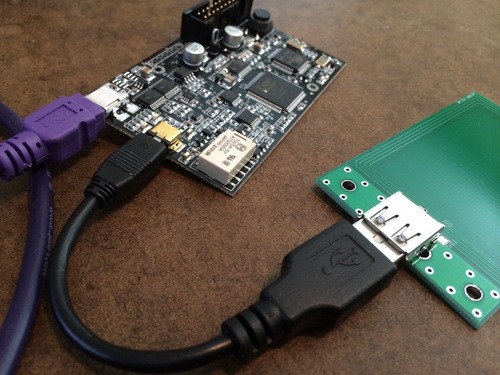
So, with the Proxmark3 connected to your computer and with one antenna attached (for example the HF one – read our first post about this device if you forgot which is which 😉 -) go to the client folder, and run ./proxmark3 comX (where X is the assigned com port number for the new CDC/serial interface). If you’re using MsWindows, you can create a little Batch script to accomplish this.
You’ll see a prompt like this: “proxmark3>” If you’re here, you’re done!
Now, your first two commands will be: hw version and hw tune. Check that your version is > 800 and that your HF antenna is working good (you might receive a “Your LF antenna is unusable”, but that’s right, because you have connected the HF one!).
Some advice: be sure you’re not connecting the USB cable that should go to the antenna to your computer USB port!. As it’s also a standard USB port (the one in the antenna, you know) and it’s easy to make that mistake and it might damage your device!.

Oh! Also, if your own an iMac or Macbook, don’t forget that the Aluminum will interfere with the RF… be sure to be a few cm. away from the base or the laptop.
If you have any further questions, you will find me as “moebius” on the Proxmark3 forums or you can write us an email and we will write you back trying to help you on this process. We will be very happy to help you!
In the next post, we’re going to understand the basics of some LF RFID badges (the ones people use to enter buildings) and we will try to emulate and clone one of them!
2018-01 Note: This article was written using the original design of the proxmark3, which was created several years ago. The process information is still valid, but the new device looks completely different so the pictures aren’t currently accurate.