It has come to our attention that some users of the iCopy-XS are experiencing a boot timeout when powering on their device. Though uncommon, we thought it would be beneficial to the community to provide a thorough troubleshooting guide that will have your device up and running in just a few minutes.
Diagnosis
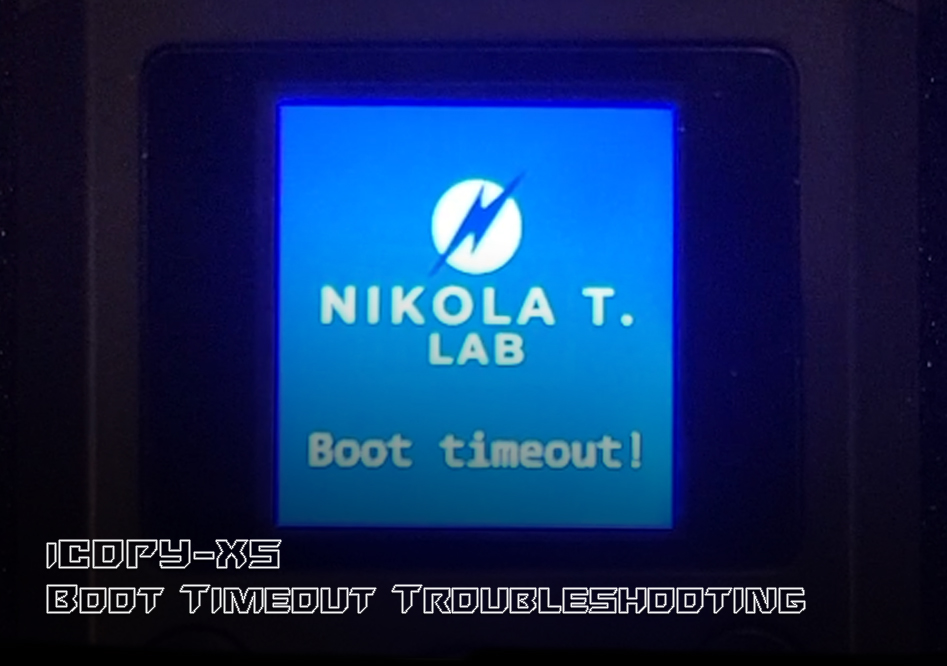
The iCopy-XS should take about 20 seconds to boot up and will display an animated graphics as the device firmware loads. If for some reason the device is unable to boot within 60 seconds, it will trigger an error screen with the message “Boot timeout!” blinking below the Nikola T. Lab logo. The device is not usable in this state, but it is not bricked. Recovering from this problem is relatively simple by following the procedures describe below.
Hard Reset
Although the device will turn off after pressing the power button for a few seconds, there is a hard reset option that can be triggered by holding down it down for a full 15 seconds before releasing this button. This will clear the device’s cache and potentially fix any software bugs causing the boot sequence to fail. If this does not fix the timeout issue, continue to the next step.
Replace Firmware
With the iCopy powered on, attempt to access the internal drive by plugging it in to a Windows or Linux device via USB C. If the drive not recognized, proceed directly to the “Reseat eMMC” section of this guide. If the drive is recognized, navigate to the root directory and locate and delete any files labeled “.ipk” – including any hidden or temporary files. With these files removed from the root directory, go to Nikola T. Lab’s online firmware generator and follow the instructions to download an updated version compatible with your device. You will need your iCopy’s serial number, which can be found on the back of the device.
Once downloaded, extract the .ipk from the .zip file to an arbitrary location on your Linux device and copy that file to the root directory of the iCopy’s internal storage. Do not extract the file directly to the iCopy’s root directory – this may lead to problems with the file structure by creating unexpected hidden/temporary files. From here, eject the device and perform a hard reset as described earlier in this guide.
Reseat eMMC
If the internal storage drive of the iCopy-XS is not accessible via Linux, the eMMC drive itself may have become physically unseated from the rest of the device. Fortunately, this is possible to fix with minimal effort and a few simple tools.
Using a plastic pry tool, remove the aluminum portion at the top of the enclosure by carefully prying at the gap between the plastic and the aluminum. Work slowly along the gap until the aluminum piece is easily separated by hand with minimal force. Be careful of the wires connecting the main board to the speaker component, which is located inside of the aluminum housing.
From here, locate the seam between the back portion of the plastic housing and the rest of the enclosure. Use the pry tool as in the previous step to carefully separate the two halves of the device. The main board is mounted to the screen-side of the enclosure, with the with the eMMC chip seated at the top of the board, opposite the USB C port. There should be a drop of glue to keep the chip seated, but it is likely that this has somehow failed and allowed the components to shift away from their contact points.
Using the tip of your pry tool or other plastic tool tip, gently nudge the eMMC chip back into place by pressing the top corners of the chip towards the board until it is square with the edge of the mainboard and fully inserted into its slot. Be very careful with this step as the circuitry and components in the device can be easily damaged.
Before closing the device back up, carefully turn the iCopy over and power it on. If the timeout problem persists, you may need to try reseating again – or go back to your Linux device and attempt to replace the firmware by accessing the root directory of the internal storage drive. Once the device is properly booting, carefully reassemble the enclosure and you’re finished!
Disconnected Speaker Wires?
If you’re anything like me, you probably used too much force to remove the aluminum top of the enclosure and thus tore the speaker wires from their contact points on the main board. Don’t worry, the device is totally functional without the speaker being connected and if you absolutely need the sound of the UI, this is easily fixed with just a little bit of soldering skill.
If necessary, desolder the contact points for the speaker wires as carefully and thoroughly as you can. Make sure to trim the wires if you lost too much of the exposed leads. The positive contact is labeled with a plus side and is on the outside edge of the main board – the one on the top right, if you are looking at the board with the antenna-side on the bottom. Using a little bit of solder and a precision tip, use your soldering iron to reconnect the red wire to the positive contact point. Next, do the same with the black wire and the negative contact point.
Before putting the iCopy back together, turn the device on. A successful boot should trigger a chime on the speaker if it was properly reconnected. If it doesn’t chime, toggle the UI menu down to volume to make sure that the device isn’t muted. Again, the device will function without the speaker being connected, so don’t be too concerned if your soldering skills aren’t quite enough for the task.
Conclusion
To summarize the procedure, boot timeouts on the iCopy-XS are troubleshot by performing a hard reset of the device, replacing the firmware via Linux workstation, or reseating the eMMC chip on the mother board. This should be something any level of user can accomplish when following the guide above.
If you are one of the rare iCopy users experiencing this timeout error, we hope that you find this article helpful and you are back to cloning RFID tags in no time! If you still don’t have an iCopy-XS of your own, visit Hacker Warehouse to pick one up or check out our Toolkit Analysis where we dive into the full scope of features and capabilities this device has to offer. Until next time, keep it between the laws and keep it between the LOLs!